2. Git 基础
2、Git 基础
这一节不是很长,但是很有用
- 配置并初始化一个仓库(repository)
- 开始或停止跟踪(track)
- 暂存(stage)或提交(commit)更改
- 忽略指定的文件和文件模式
- 迅速而简单地撤销错误操作
- 如何浏览你的项目的历史版本以及不同提交(commits)之间的差异
- 如何向你的远程仓库推送(push)
- 如何从你的远程仓库拉取(pull)文件
1. 获取 Git 仓库
获取 Git 仓库的方式有两种, 一种是从已经存在的仓库中 克隆(clone)一个,另一种就是直接将自己现有的文件目录初始化
1.1 在现有目录中初始化
1 | git init |
这个命令将创建一个名为.git的子目录,这个目录含有初始化 Git仓库所需要的所有文件, 这些文件是 Git 仓库的脚手架
但是这是在这里只是将仓库进行了初始化, 并没有对项目的文件进行跟踪(track), 你可以使用 git add 命令来对文件进行跟踪, 然后进行 git commit提交
1 | git add *c |
现在, 这个仓库就变成实际维护(跟踪)若干个文件的 Git 仓库了
1.2 克隆现有的仓库
可以直接使用以下命令
1 | git clone 链接 |
2. 在仓库中记录更新
现在你已经有一个仓库了, 现在我们看看怎么使用 git 来提交快照
记住对于一个文件而言, 有两种状: tracking, untracking.
没有被追踪的文件什么也不是, 完全被排除在 git 之外了.
被追踪的文件又分为 unmodified modified staged 三个级别, 前面提到过

2.1 检查目前的状态
首先介绍一个比较常用的命令 git status, 你可以用这个来查看工作目录都有哪些变化
在新的仓库里直接运行 git status, 得到的是这样的结果:
1 | daren@DESKTOP-41GKCL7:~/Workspace/gitPlayground$ git status |
上面说没有东西可以提交. 这意味着你的工作目录中的所有被追踪的文件都没有被修改. git 不会管那些没有被追踪的文件.
现在我们在文件夹里面添加一些文件, 再来执行命令.
1 | daren@DESKTOP-41GKCL7:~/Workspace/gitPlayground$ echo 'My Project' > README # 创建一个 README 文件, 在里面写入 "My Project" 文本 |
可以看到现在 git 就会提示你有没有追踪的文件, 但仅仅是列在那里, 并不会对未追踪的文件进行操作
如果你觉得git status给的内容太详细了, 显得特别乱, 还可以用 -s 来显示精简版本的git status
- ? ? 文件没有被跟踪
- A 文件首次添加进缓存区
- MM 第一个M代表文件已经被放进了缓存区, 第二个M代表目前工作目录中有一个被修改的版本还没有被放进缓存区(这两个M可以同时出现, 也可以只出现一个)
1 | git status |
2.1 跟踪新文件, 添加到 staged area
1 | git add [文件名] |
这个命令有两个功能:
- 把文件设置成 tracked
- 把文件添加到缓存区里
如果你 add 的是一个文件夹, 那么这个文件夹下面所有的文件都会被添加.
当然这个方法太累了, 不可能一个一个的添加文件.可以直接配合 shell 的正则表达式.
1 | daren@DESKTOP-41GKCL7:~/Workspace/gitPlayground$ git add README |
运行 git add 的同时, 文件已经自动被存到了暂存区里, 这时候运行 git status, 你可以看到这个文件在”即将被提交”一栏下面了

git 追踪的是内容, 不是文件本身
许多版本管理系统的 ‘add’ 命令都是让系统来追踪某个文件的. 而 git add 的行为更加的简单强大: git add 可以同时给没有追踪的文件和被修改的旧文件用. 这两种情况下 git 都会获取文件的快照, 并且把文件存放在索引中, 包含到下次提交中.
2.3. 提交到 快照(tree)
之前提到这个最终文件都是类似快照的方式存放在硬盘里的, 那么要提交到快照就要使用
1 | git commit |
这个命令会把当前存放在缓存区(staged area)的数据提交到快照, 所以如果你的缓存区中的文件和在工作目录(working directory)下的同一个文件不同, 提交的时候只会提交缓存区的不会去管工作目录下的文件.
每次提交都必须要写说明, 这个时候就会自动打开之前设定的文本编辑器, 当然也可以不用文本编辑器, 直接用 git commit -m '[要写的提交信息]'
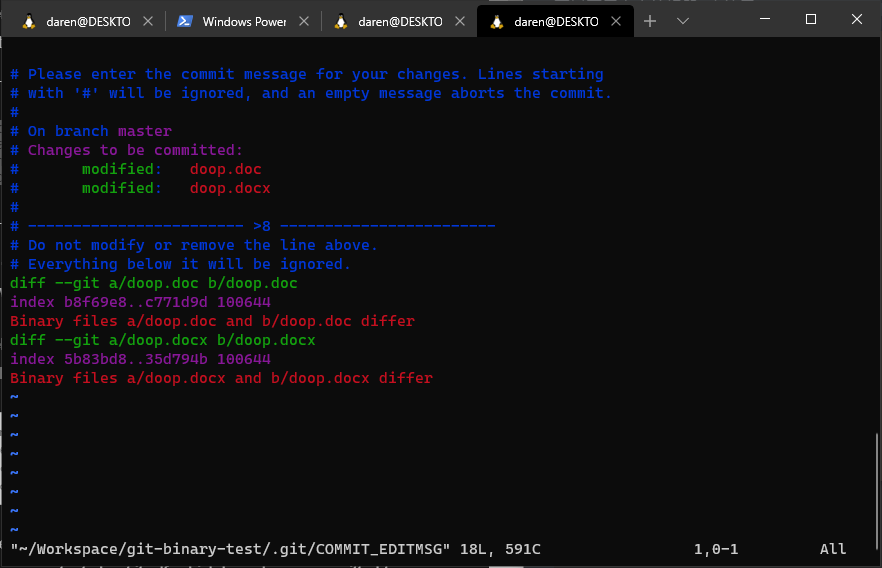
文本编辑器的第一行会空出来, 让你填写相关的提交信息, 空的提交信息会被作废, 而 # 开头的行不会被包含到提交信息中, 只是为了提醒你之前干嘛了. 如果你要看具体更改了什么, 可以直接在后面加一个 -v 参数, 这个会在你的提交信息中添加类似于 git diff 的信息, 让你看看到底修改了什么
1 |
|
加 -v 之后是这样的:

如果你觉得每次提交之前都要用 git add 太繁琐, 可以这样git commit -a会把以前跟踪过的文件自动进行添加, 方便快捷.
提交完成后返回的信息是这样的:
1 | git commit -m "Story 182: fix benchmarks for speed" |
[分支 提交的SHA1校验信息] 提交信息
2.4 忽略不想要的文件
git 中可以通过快照来保存项目的文件, 这是非常棒. 但是有的时候项目文件夹下面有各种各样自动生成的文件, 比如 npm 的包, gcc 生成的 .o 文件, 编译结果等等.
对于大部分的项目来说, 保存项目的源码就已经足够了, 这样还可以节省 git 占用的空间, 用 git 服务器的时候每次提交到服务器的速度也会更快. 所以我们要想办法去掉没有用的文件, 这就需要 gitignore 文件.
2.4.1 使用 gitignore 文件
首先我们在项目根目录下创建一个 .gitignore 文件(注意文件名前的., 这在 unix 系的操作系统里面代表隐藏文件), 并且在里面保存下面的内容
1 | *.[oa] |
上面这段文本的意思就是要求 git 在添加的时候忽略扩展名为 o 以及扩展名为 a 的文件, 这些文件是 C 编译的字节文件和编译结果. 同时忽略以~结尾的文件, 这些文件是文本编辑器的临时文件.
与 gitignore 中匹配的文件都不会被 git add 添加到缓存区, 如果你尝试添加, 会得到这样的提示:
1 | daren@DESKTOP-41GKCL7:~/Workspace/gitPlayground$ git add aaa.o |
意思是你已经忽略了这些文件了, 所以不能添加, 如果要强制添加的话要带一个 -f 参数.
2.4.2 .gitignore 文件规范
- 所有空行或者#开头的行都会被 git 忽略
- 可以使用标准 glob (简化shell正则表达式) 模式匹配
- 匹配模式可以用 / 开头防止递归
- 可以用 / 开头指定目录
- 要忽略指定模式之外的目录, 可以直接在前面加 ! 取反
另外https://github.com/github/gitignore上还有很多 .gitignore的模版合集, 可以下着玩玩, 也可以提高生产力
有关子文件夹中的 gitignore 文件
In the simple case, a repository might have a single
.gitignorefile in its root directory, which applies recursively to the entire repository. However, it is also possible to have additional.gitignorefiles in subdirectories. The rules in these nested.gitignorefiles apply only to the files under the directory where they are located. The Linux kernel source repository has 206.gitignorefiles.It is beyond the scope of this book to get into the details of multiple
.gitignorefiles; seeman gitignorefor the details.
2.4.3 glob 模式
1 | *可以匹配0个或者多个任意字符 |
2.4.4 一个.gitignore 文件的例子
1 | no .a files |
2.5. 查看你究竟修改了什么
要看你修改了哪些文件, 可以直接用之前提到的 git status, 但是这个命令给的也太模糊了, 要是你想看看这些文件具体都改了啥, 可以用 git diff
1 | # 我要看看我还没暂存的修改, 工作区文件对比缓存区文件, 结果中显示的是你还没有存储到缓存的更改 |
尚未暂存的更改 changes you have made but not staged - git diff
git diff 只能看尚未暂存的改动, 也就是 modified, 还没有 staged
已经暂存的修改 changes you have made and staged - git diff –staged
2.5.1 一个例子
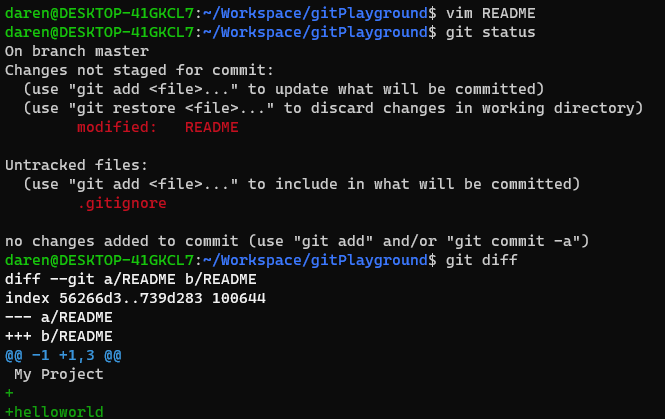
我们修改下 README 文件, 在里面添加一行 helloworld
1 | My Project |

可以看到结果中展示了我还没有提交到缓存区的更改, 对比的是缓存区和工作目录
这是如果我使用git diff --cached, 或者 git diff --staged 查看仓库中快照和缓存区的区别的话, 返回的信息是空的

这次我们把刚刚修改的 README 文件添加到缓冲区.

可以看到这次git diff 返回的结果是空的, 因为工作目录中没有尚未添加到缓冲区的更改, 所以并没有尚未保存到缓存区的更改. 而 git diff --cached 则显示了缓存区和仓库快照的区别, 所有尚未被保存到快照的更改都展示出来了
除了 git diff, 在 git 内部的 工具中可以使用外部的文本编辑器来查看详细的变动信息, 要使用这个工具运行 git difftool 即可. 要查看相关帮助可以使用 git difftool –tool-help
后面还会有 git diff 的别的使用方式.
2.6 删除文件
由于 git 要把所有文件记录成快照, 所以要删除文件要考虑到工作目录和缓存区, 两个位置. 要在 git 中删除文件, 需要使用git rm命令, 直接运行这个命令会有两个行为:
- 删除在缓存区中的这个文件的记录(在缓存区中添加这个文件被删除的更改记录)
- git 还会顺便帮你删掉工作目录中的这个文件
注意 git 的哲学就是在仓库中只进行添加, 不删除, 这样会最大程度保全数据. 所以仓库中已经 commit 的文件就不能删除了.
1 | daren@DESKTOP-41GKCL7:~/Workspace/git-binary-test$ touch test.txt |
在实际使用的时候会有各种奇怪的需求, 比如加入我直接删掉了工作目录中的这个文件该怎么操作缓存区?
2.6.1直接删掉工作目录的文件
首先要注意的一点是, 缓存区保存的不是文件, 是工作目录相对上次提交的更改记录(快照 snapshot), 所谓缓存区, 就是一个保存更改记录的区域, 提交给仓库的也是更改记录
如果你直接删掉工作目录下想要删除的文件的话, 这时使用 git status 查看状态, 可以看到文件已经被删除的更改记录, 而且这个操作并没有被添加到缓存区
1 | daren@DESKTOP-41GKCL7:~/Workspace/git-binary-test$ rm test.txt |
所以我们需要用 git add 或者 git rm 来把这个删除的操作记录到缓存区, 当然提交的时候也可以用 git commit -a 自动把这个更改 add 到缓存区中然后提交.
如果你的已经被追踪的文件本身已经进行了修改, 或者已经这个文件添加到了缓存区, 那么你需要使用 git rm -f 才可以添加文件的删除记录, 这个机制主要是为了防止出现不必要的数据丢失.
1 | daren@DESKTOP-41GKCL7:~/Workspace/git-binary-test$ echo 'test' > test.txt |
2.6.2 只删掉暂存区的文件
要是你发现你不小心把编译的结果, 或者一个很大的log文件加到暂存区里了 现在你想去掉这个文件不再追踪, 但是继续保留在磁盘中, 然后把它加到 .gitignore 里, 就可以这么来操作, 直接用 git rm –cached 即可
1 | daren@DESKTOP-41GKCL7:~/Workspace/git-binary-test$ git status |
2.7 使用 mv 指令
注意这里说的 mv 就跟Linux上的mv一样, 可以用来重命名文件(在你重命名文件的时候, git 会发下你是在重命名而不是移动文件), 也可以用来移动文件. 事实上, git mv 是铁铁的指令语法糖, 因为这个指令跟下面三个指令的组合是等效的.
1 | $ git mv README.md README |
1 | git mv file_from file_to |
3. 查看提交记录
使用 git log 可以查看所有修改记录, 这个简单的命令可以帮你查看 提交的 sha1 校验码, 以及作者和他的邮箱, 再加上提交的时间和描述. 谁对你的项目动手动脚? 一目了然.
使用 参数 -p 可以比较每次提交的差异, 也就是每次的 git diff
使用 参数 -数字 可以显示最近几次的提交记录, 便于查看
如果你还想看到每次提交的 状态信息, 可以在参数上添加 –stat 选项
另外一个比较强大的参数就是 –pretty 和相应的 format 参数, 这里不做太多叙述
1 | daren@DESKTOP-41GKCL7:~/Workspace/git-binary-test$ git log |
4. 撤销操作们
git 提供了多种方式来帮助你处理开发中遇到的错误. 你可以根据是否已经进行了 commit, 以及 commit 之后有没有跟别人分享代码, 来选择合适的插销操作
4.1 从仓库或者缓存区中修复尚未提交的错误
如果你把你的工作区弄的一团糟, 但是还没有进行提交, 你可以把整个工作目录恢复到上次 commit 之后的状态.
1 | $ git reset --hard HEAD |
这么做会抛弃所有在工作目录以及 git 索引(缓存区)中的更改, 所以这时你用 git diff 和 git diff –cached 都是空的.
如果你只想要恢复其中一个文件, 你可以使用 git checkout
1 | $ git checkout -- hello.rb # 恢复在 index 中的版本 |
第一个提交恢复的是 index 中的版本, 所以运行完之后 git diff 会返回空结果. 而第二次提交恢复的是在上次提交之后的版本, 所以 git diff –cached 和 git diff 都会返回空结果.
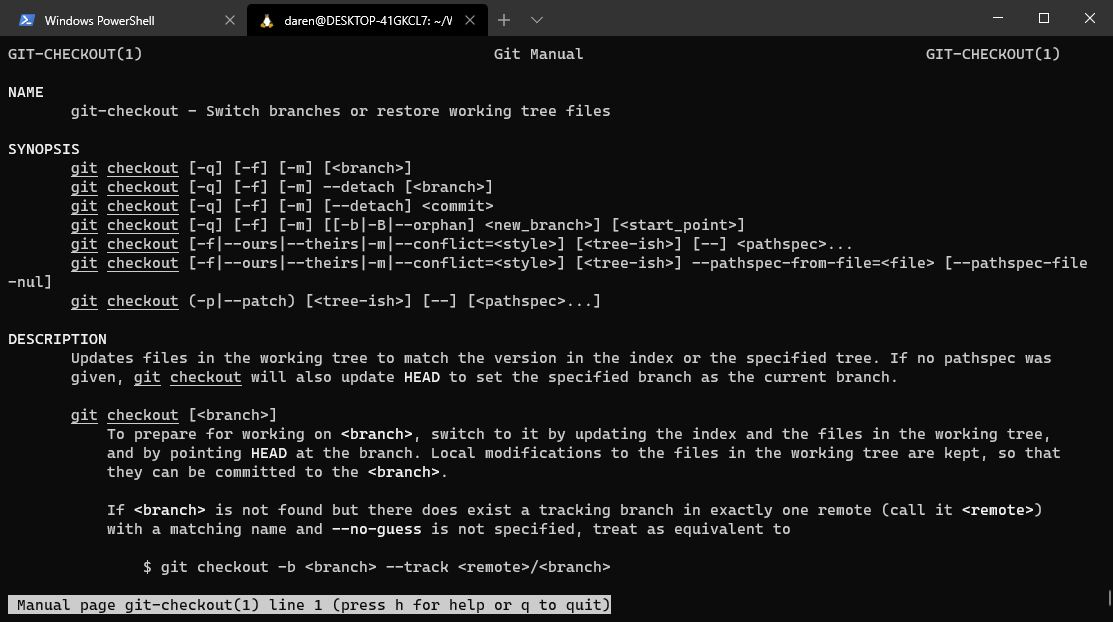
有关版本回退, 书里写的是用 git checkout
这时候就可以用 git checkout – <文件名> 来把工作区了中的文件会退到上一个版本. 这个相比 git reset HEAD 的就是前者编辑工作区, 文件从 modified 状态改回 unmodified , 后者编辑暂存区 , 都是回退
但是 git checkout 在 2019 年八月的 git 2.23.0 中被 git restore 取代了, 因为原来的 git checkout 负担了太多功能, 比如
- 创建新的分支
- 从远程仓库取回分支
- 切换你当前正在使用的分支
- 从缓存区删除文件
- 将工作目录恢复到某一个 commit
- 其他各种奇怪的并不常用的(而且你希望你会用到)的功能
显而易见, git checkout 的功能太多了, 多到新手看了头皮发麻, 老手觉得烦的地步. 而且这并不符合 Unix 的
do one thing and do it well哲学所以为了方便, git checkout 实际上被拆分成了两个命令: git restore 和 git switch, 前者专门用来从仓库恢复工作区的文件, 后者用来操作分支. 需要注意的是, git restore 是实验性的指令, 后面可能会有更改
使用 git restore 可以直接将工作区文件回到上次 commit 的状态, 而 git restore –cached 可以将缓存区的文件回到上次 commit 的状态.
2
3
4
5
6
7
8
9
daren@DESKTOP-41GKCL7:~/Workspace/gitPlayground$ git add README
daren@DESKTOP-41GKCL7:~/Workspace/gitPlayground$ git commit -m 'shit'
[master de9cd0a] shit
1 file changed, 1 insertion(+), 3 deletions(-)
daren@DESKTOP-41GKCL7:~/Workspace/gitPlayground$ echo 'test2' > README
daren@DESKTOP-41GKCL7:~/Workspace/gitPlayground$ git restore README
daren@DESKTOP-41GKCL7:~/Workspace/gitPlayground$ cat README
holy shitgit restore 的思想, 以及 git rm, git reset 三者关系
使用 git restore 的时候你可以理解为”恢复”: 将工作目录或者缓存区的文件恢复成上次 commit 的样子, 如果带 –staged 恢复的是缓存区, 不带参数或者使用 –worktree 恢复的是工作目录
使用 git rm 注重的是”删除”, 使用 git rm –staged 的时候虽然会将文件从缓存区删除, 同时也会将这个文件从缓存区(index)删除, 文件将会变回 untracked 状态
git reset 是用来切换指针指向不同的仓库快照的, 暂且不讨论这个
https://en.wikipedia.org/wiki/Unix_philosophy
有关保存进度和分支的更详细介绍, 可以看一下有关 git 分支管理 的进阶文章
4.2 修复已经提交的错误
如果你有意境提交的错误, 那么你有两种思路来进行处理:
- 一是再创建一个新的 commit, 这个新的 commit 会抵消你之前的错误的提交(乍一看很难理解, 但是这么想: 我有一个 commit 错了, 那我在 commit 一下改回来呗)
- 第二种方法是回去修改一个旧的提交. 如果你已经发布了代码(比如推送回了上游仓库之类的)你就绝对不能这么做. git 设计的时候没有考虑到修改 commit 的“历史”, 同时不能正确的从一个历史被改变的分支进行合并
4.2.1 通过新提交来进行修复
创建新的提交来返回之前的更改很简单: 只需使用 git revert 就可以.
1 | $ git revert HEAD |
这个将会创建一个撤销 HEAD 操作的新的提交. 你也可以修改这个新提交的信息.
你也可以回到更早的提交, 比如 HEAD 之前的提交
1 | $ git revert HEAD^ |
git revert 会创建一个和当前存在的提交相反的提交
使用之后, 工作区的文件的状态将会回到某个提交从来没有存在的状态. 例如, 下面的例子:
1 | darren@localhost:~$ cd revert-demo/ |
现在有了两个提交, 我们想抵消掉最近的 坏提交, 回到 bad update 之前的状态:
1 | darren@localhost:~/revert-demo$ git revert HEAD |
现在, git 通过新的 commit, 让工作区的文件回到了之前的状态
1 | darren@localhost:~/revert-demo$ git log --oneline |
除了 HEAD, 所有的提交都可以使用 git revert, 另外有新提交的好处就是, 你和你同事不需要进行别的复杂操作, 只要像之前一样进行 push, pull, fetch, merge 这样的操作即可.
4.2.2 通过编辑 commit 本身进行修复(不推荐)
我 commit 的信息写错啦怎么办?
强迫症看到这个问题要抓狂了, 其实这个直接用 git commit –amend 就能修改上次的 commit 信息
那我有两个文件忘记 stage 了结果我不小心进行了 commit ?
这种问题直接在现在进行 stage 然后再 commit 一遍也不晚, 但是对于处女座选手, 也不是无可救药, 直接 add 想要添加的文件再 git commit –amend 就好, 这样操作后只有一个 commit 记录
1 | git commit -m 'initial commit' |
4.3 我有暂存的文件要取消.
之前提到的 git rm –cached 可以帮上你的忙, 也可以尝试一下 -status 里提示的新方法 git reset HEAD 这个命令, 对于新增文件, 二者是等效的. 这两个命令都是对 stage 的操作, 只改变 stage 暂存区.
不同之处在于前者的用处就是直接删掉暂存区的文件, 并且会在提交之后连同 repository中的相应文件一并删除, 而后者则是直接退回到上一次 commit 的版本. 重申一遍, 只对 stage 暂存区进行操作.
如果想要深入了解一下这两个, 可以看一下这篇文章(不是csdn大垃圾堆) https://www.cnblogs.com/sunshine-xin/articles/3521481.html
5. 远程仓库(有内味儿了)
为了让你的 git 项目能够进行协作, 你需要知道如何管理远程仓库. 远程仓库指的是你的项目被托管在网络上. 你可以同时有多个远程仓库, 这些仓库有的是可读可写的, 有的是只读的. 与他人合作涉及到管理这些远程的仓库, 以及从远程仓库拉取信息和给仓库推送信息. 所以, 如何添加远程的仓库, 删除不再有效的远程服务器, 管理多个分支等等都是很重要的. 所以我们先来看看一部分管理分支的技巧.
在你本地的电脑上也可以有远程仓库
在你自己的电脑上创建一个 “远程”仓库是完全可行的. “远程”这个词不仅是在网上, 只要是在别的地方都可以算作是“远程”. 如果你有一个本地的远程仓库, 那么你也需要像操作其它远程仓库那样对本地的远程仓库进行 push, fetch, pull 等操作.
什么是 remote name
就是你的远程仓库的一个昵称(short name), 可以用在命令行里面代替完整的远程仓库 URL
5.1 查看远程仓库
要查看你已经配置了哪些远程服务器, 可以在你下载到本地的 git 项目文件夹里使用 git remote 命令来列出所有远程服务器的昵称. 如果你是 clone 的项目, 你会看到 origin 这个远程仓库服务器.
1 | $ git clone https://github.com/schacon/ticgit |
你也可以加上 -v 参数, 来展示用来读写仓库的 URL:
1 | $ git remote -v |
如果你有一个以上的远程参股, 这个命令也会把它们全部列出来. 例如, 这里有一个多服务器(每个贡献者都有一个自己的远程服务器)的 git 远程仓库
1 | $ cd grit |
这让我们可以十分简单的从所有的贡献者那里拉取代码. 我们也可以获取其中几个 git 远程服务器的写入权限, 这里暂时不聊.
注意这些远程服务器可以来自多种协议.
5.2 添加远程仓库
之前展示了使用 git clone 来添加 origin 服务器, 现在我们看看怎么额外添加其他的服务器.
要添加新的远程仓库, 可以使用 git remote add <shortname> <url>
1 | $ git remote |
注意 clone 或者 fetch 到本地的仓库就算做是本地仓库了, 和服务器里的远程仓库进行对应:

现在你就可以使用 pb 来代替完整的 url 了, 例如, 如果你想要拉取所有 Paul 有但是你没有的信息到你的仓库里, 你可以使用 git fetch pb
1 | $ git fetch pb |
Paul 的主分支现在就可以使用 pb/master 进行访问了. 你可以将它合并到你的分支里, 你也可以 checkout 到某一个分支. 后面 Git 分支 会讲到.
git remote add 和 git clone
前者只是在 git config 文件中存储了一个远程仓库服务器的昵称的 url, 你需要先有一个仓库才能使用这个命令.
后者直接拷贝了一个远程服务器, 同时建立了这个远程仓库在本地的源, 同时在本地的源中添加了远程仓库, 命名为 origin, 可以看作是简化了 git remote add 的流程, 但是二者思想上是不同的, git clone 是整个仓库. 但是 git remote 只会添加远程仓库.
还有就是如果你克隆的是一个本机的仓库, 那么 git 会直接建立这个仓库中文件的硬连接, 来节省硬盘空间. If you clone a local repo,
gitwill hard-link the files under.git/objects/to save some disk space. You can disable this optimization by using--no-local
2
3
4
5
6
7
# 上下的效果基本是一样的, 只不过概念不同 git remote add 只会添加仓库, 这个过程会丢失其他的 git config 配置. 而 clone 会下载整个仓库, 包含仓库的 git config 配置.
$ mkdir foo
$ cd foo
$ git init
$ git remote add origin REMOTEURL
$ git pull origin master
5.3 Fetch 和 Pull
就像刚才那样, 如果你想从一个远程仓库拉取文件, 可以使用
1 | $ git fetch <remote> |
这个命令会从远程仓库拉取所有你还没有的数据. 在你拉取完成之后, 你就有了这个远程仓库所有的分支. 你可以合并或者查看这些分支.
如果你克隆了一个仓库, 这个命令会添加名为 origin 的远程仓库. 所以 git fetch origin 可以拉取自从你克隆之后所有的更改, 有一点需要注意的就是 *git fetch 只会将数据下载到本地, 但是不会自动对数据进行合并, 或者修改你正在进行的工作. * 你必须在你准备好的时候手动进行合并.
如果你当前的分支被用来追踪一个远程的分支, 你可以用 git pull 来自动拉取并且合并到你当前的分支, 这个可能会更加方便. 默认情况下, git clone 会自动让你本地的 master 分支追踪远程的 master 分支, 这时使用 git pull 会从你原来 clone 的远程仓库拉取数据, 之后自动尝试合并到你的代码里.
5.3 推送到远程仓库
当你准备好手头的工作的时候, 你可以将代码合并到上游(Upstream), 这个命令也很简单: git push <remote> <branch> 如果你想要把你的 master 分支发送到 origin 服务器, 你只需要这样就可以:
1 | $ git push origin master |
这个命令只能在你有仓库的写入权限的时候用, 并且用的时候需要没有别人占线(两个人不能同时进行 push, 否则后来的那一个会被拒). 另外, 在你 push 之前, 你需要先 fetch, 来保证你的远程追踪分支能和远程仓库里的分支对应起来.
什么是 “上游(Upstream)” 和 “下游(Downstream)”
这个概念就像上传(Upload)和下载(Download)一样, 只不过上游和下游是名词, 而上传下载是动词.
在版本控制系统中, 当你拷贝( clone, checkout 等)的时候, 你就在下游(Downstream), 当你做完更改准备上传到服务器的时候, 准备上传的时候, 你就可以把你的代码发回“上游”
5.4 查看远程仓库
如果你想看看有关某个远程仓库的信息, 你可以使用 git remote show <remote> . 使用这个命令的时候必须联网, 并且至少有一个远程仓库能够正常访问. 这个命令会拉取远程仓库的相关信息, 并结合本地的信息展示出来.
1 | $ git remote show origin |
这个命令会列出这个仓库的 URL, 以及远程跟踪分支的信息. 同时告诉你你现在在 master 分支上, 如果你运行 git pull, 会自动从远程仓库拉取远程的 master 分支并且和本地的 master 分支进行合并, 同时也会列出已经拉取的分支.
如果你经常用远程仓库的话, 你可能看到更多的信息.
1 | $ git remote show origin |
这个命令会展示当你使用在某个分支上 git push 的时候, 那一个分支会被推送. 同时展示了你没有哪些分支, 以及哪些分支你有但是已经被远程服务器移除的分支, 以及哪几个本地的分支会在运行 git pull 的时候自动合并.
5.5 删掉或者重命名远程仓库
如果想要对某个远程仓库重命名, git remote rename 即可
1 | git remote rename pb paul |
要移除远程仓库, 直接 git remote rm
1 | git remote rm paul |
当你删掉远程仓库的时候, 这个仓库的远程分支以及有关配置文件都会被自动移除.
6. 打标签/刷版本号
要是跟着翻译来, 那就是打标签(tag), 其实就是刷版本号, 顶多听起来高大上一点就是了. 而且这个也太简单了, 就是书里啰哩啰嗦
可以把 tag 理解为将特殊的有里程碑意义的 commit 单独罗列出来方便管理
6.1 我想看有哪些版本
1 | git tag |
6.2 我想打标签, 顺便写两行注释
1 | git tag -a v1.4 -m "my version 1.4" |
打标签的时候记得写 -a 后面的 -m 参数跟着要写的注释
这时候问题就来了: 我怎么看这写注释呢
1 | git show v1.4 |
6.3 打标签就完了, 写什么注释
简单粗暴
1 | git tag v1.4-lw |
要是现在你还想用 show 来看一看这个版本的话, 自然就没有相应的注释了
